13 Set Up a MIDI Foot Control For Learning Solos
MIDI foot pedals come in many shapes and sizes. Some are simple, with one or two switches; others have more, and let you attach volume and expression pedals. But it’s unlikely that we have the same pedal you do, so we’re going to walk through the setup of an imaginary MIDI foot pedal (Figure 13.1).
13.1 About the Pedal
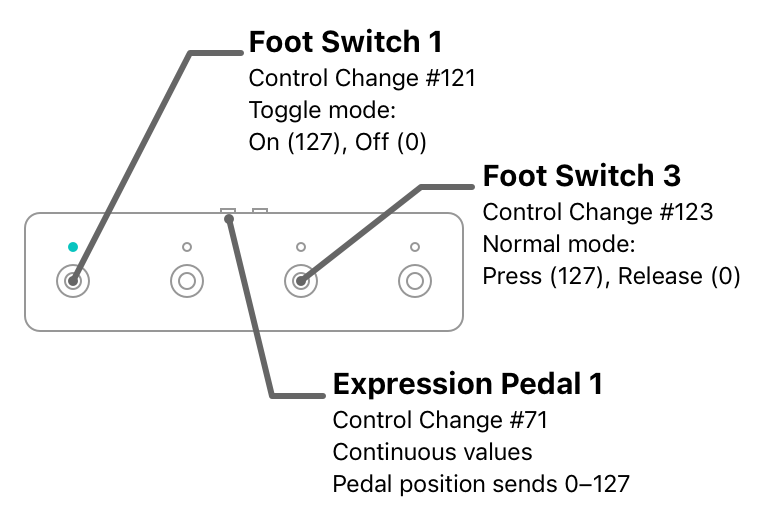
From the factory, this pedal is configured with two different foot switch behaviours:
- Toggle: When you press and release the switch, it either turns ON, or OFF—the state of the switch stays the same after you release it, with a light that reflects the current state.
- Normal (Momentary): These are in the ON state only while they are held down; they switch OFF once they are released.
Regardless of behaviour, the ON state sends a control change message with a value of 127, and the OFF state sends a control change message with a value of 0.
When you attach an expression or volume pedal to either of the jacks on the back of the unit, it sends control change messages with values corresponding to its position: all the way up, the value is 0; half-way down sends a 63; and the value is 127 at the bottom of the pedal’s travel.
MIDI pedals like these require calibration to work correctly with expression or volume pedals. If you fail to calibrate your hardware, your pedal may never send values all the way to 0 or 127. You can verify that your pedal is working correctly using the learning feature in the MIDI message editor. Consult the product’s support materials if you’re having trouble with this.
13.2 A Configuration for Learning Solos
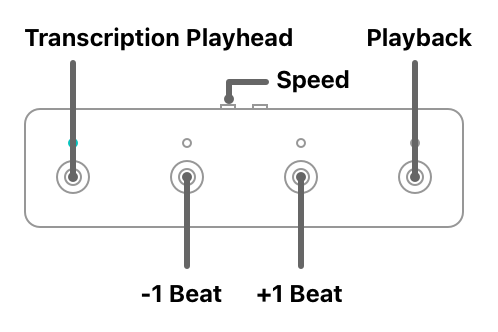
The configuration shown in Figure 13.2 would be very helpful for learning solos. While the first light is on, we know the transcription playhead is active. The middle two switches let us move the playhead by one beat at a time. The fourth switch is meant to help us learn the solo in small, bite-sized chunks: while this switch is held down, the recording plays; releasing the switch stops playback.
The expression pedal controls the speed of playback: when all the way down, the song plays at full speed; at the top, it slows to 25%; other positions select the speeds in between.
13.3 Creating the MIDI Bindings
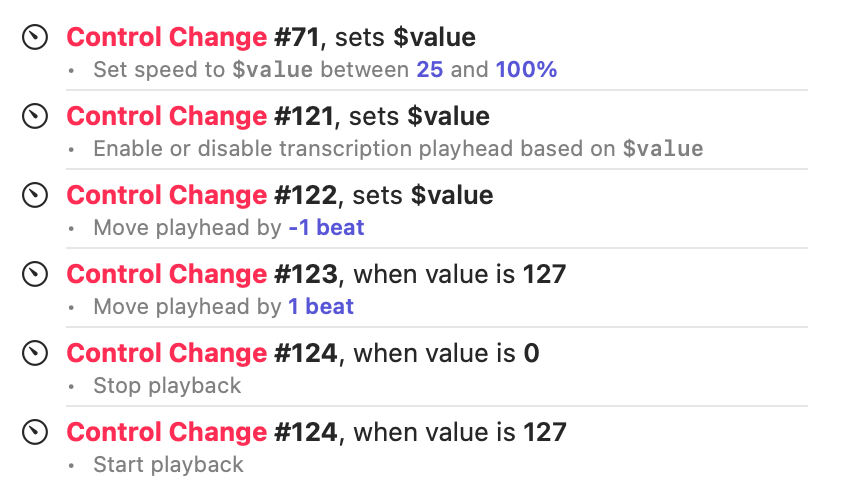
In this list we see the expression pedal (CC #71) followed by the four switches (CC #121–124). The expression pedal is rather straightforward: it is a variable binding that translates values from the pedal (0–127) into a speed of 25–100%.
For the first switch (CC #121), we use a variable binding even though the switch sends only 0 (OFF) or 127 (ON). Capo can translate these values into the correct OFF and ON states for its commands. This is a handy shortcut, but you can also use two separate bindings like we did to configure the fourth switch (CC #124).
This use of variable bindings to control commands with boolean (ON and OFF, or true and false) parameters is most useful with MIDI controls that behave like switches. If you tried to achieve this using a NoteOn event from velocity-sensitive controls, you would have to make sure to activate the control by applying the correct force to send a value larger than or equal to 64 (ON), or smaller (OFF).
You might have noticed that the second (#122) and third (#123) bindings are configured differently, even though they are meant to do the same thing. Recall that the second switch is a toggle, just like the first one: every time the switch is pressed, it alternates between sending 127 (ON) and 0 (OFF). Had we configured this binding exactly like the third switch, the second switch would have to be pressed twice to move backwards. To achieve the desired behaviour, we specify a variable value that we ignore in the command list. That way, Capo will execute the command regardless of whether the switch sends a 0 or a 127—a single press always moves backwards.
In this example configuration, we set all of the bindings to match incoming MIDI messages on any channel. This may not be the correct choice for your hardware, especially if you have many MIDI devices attached at the same time, and you don’t want commands to trigger unexpectedly. If you’re worried about this happening, be sure to specify a channel for your MIDI message triggers. Use the learning feature in the MIDI Message Editor if you aren’t sure what to specify here.