19 The Practice Song View
When you launch Capo for the first time, you will see the Practice song view by default—it’s where Capo users spend most of their time listening to and learning from the recording.
To show the Practice song view:
- Click the song view selector at the leftmost corner of the toolbar
- Choose “Practice” from the pop-up menu
To show the Practice song view:
- Tap the song view selector at the very top of the project view
- Choose “PRACTICE” from the pop-up menu
19.1 Navigating the Recording
The Practice song view represents the recording as a waveform on a timeline. While the song plays, Capo moves a playhead along the timeline to indicate where you are in the recording. You can move to another part of the recording by moving the playhead yourself.
To move the playhead:
- Click inside the timeline area above the waveform, and the playhead will be positioned wherever you place it
You can click directly to move immediately, or you can click & drag slowly to make fine adjustments to the location when reviewing a few notes that just played.
You can use the ← and → keys to move one bar at a time, or press ⇧← and ⇧→ to move one beat at a time.
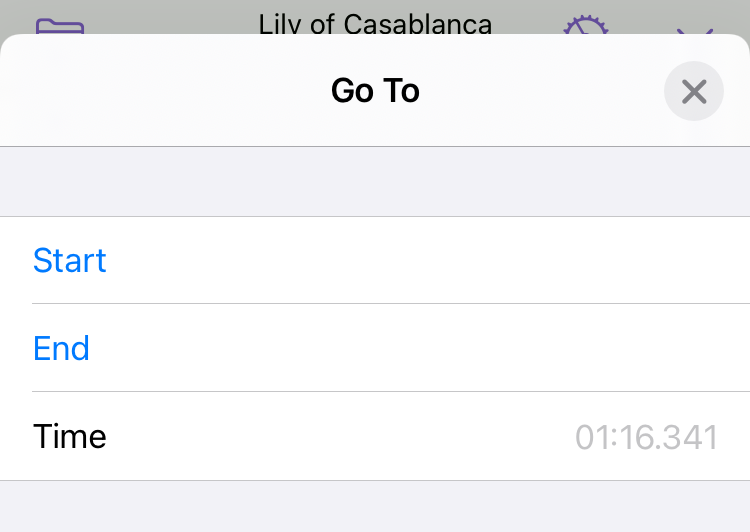
To seek to a specific position in the song, do one of the following:
- Choose Control > Go To Bar… from the main menu, and enter the bar/beat position
- Choose Control > Go To Time… from the main menu, and enter the time position
To move the playhead:
- Scroll horizontally by swiping your finger across the display, and the playhead moves as you scroll
You can swipe rapidly to move quickly, or make fine adjustments to your location when reviewing a few notes that just played.
To seek to a specific position in the song:
- Press and hold on the position display
- Enter a specific position for you to seek to, or tap to seek directly to the start or end of the song
19.2 Zooming In and Out
Zooming allows you to reveal more or less detail in the song you are working on. Zooming in allows you to see more detail, and makes it easier to seek or scrub to precise locations. Zooming out will give you more perspective on the overall structure of the song, making it easier to create larger Regions.
To adjust the timeline scale, do one of the following:
- Using a trackpad, use the pinch gesture anywhere in the song area to zoom in and out
- Press ⌘= or ⌘- on your keyboard to zoom in or out, respectively
To adjust the timeline scale:
- Use the pinch zoom gesture on the waveform area to change the time scale
When there’s not enough room, Capo will show only the last chord in a group of chord changes. When chords are hidden, you’ll see an ellipsis (…) character before the chord name. For example, see the …Am shown in the example below.
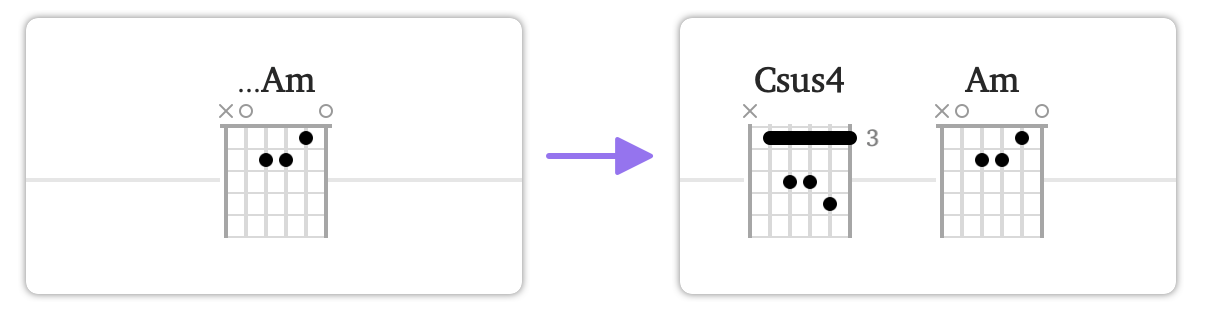
You can “break apart” these groups of chords by zooming in further. In the example above, you’ll see that the Csus4 chord was hidden by the Am.
On the Mac, you’ll notice Capo uses a similar scheme to collapse its tablature entries when they are visible. However, it’s the first note that’s shown in a group. E.g., a 3… will be displayed to indicate there are more frets to be played on that string.
19.3 Markers
To place a marker at the playhead, do one of the following:
- In the Practice or Tabbing song view, click the “place marker” toolbar item
- Press M on your keyboard
To navigate between markers, do one of the following:
- In the Practice or Tabbing song view, click the left and right arrows on the markers toolbar item
- Press ⌥← or ⌥→ on your keyboard
To place a marker at the playhead, do one of the following:
- Tap the “place marker” item in the MARKERS control strip
- Press the M key on an attached keyboard
To navigate between markers, do one of the following:
- Tap the left and right arrows in the MARKERS control strip
- Press ⌥← or ⌥→ on an attached keyboard
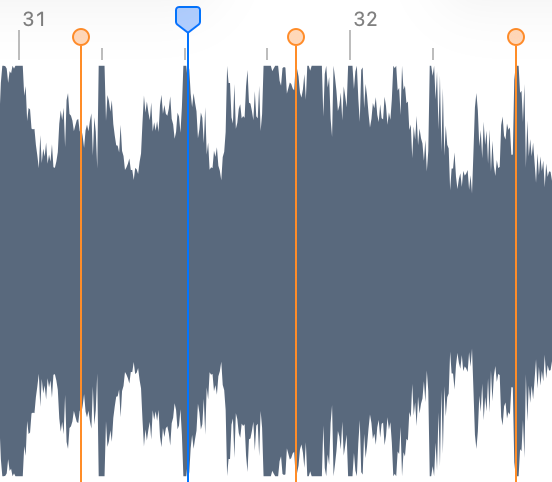
19.4 Regions
To create a region, do one of the following:
- Click and drag in the waveform area
- Click the place region item in the toolbar
To create a region:
- Move the playhead inside the bar where you want to create a region
- Tap the place region item in the REGIONS control strip
- (Optionally) Drag the resize handles to change the size of the region
By default, regions “snap” to the beat grid as you create and adjust them. That way, they always start and end at the nearest beat location. If things don’t seem to line up with the song, you can use the Structure song view to correct the beat grid.
If you’d rather disable the snapping behavior, hold the shift key on your Mac while you drag regions. On your iPhone or iPad, move your finger above or below the drag handle to disable snapping.
19.5 Chords
The song’s chords appear below the waveform area in the Practice song view. Just like Regions and Markers, chords appear at the spot where they occur on the timeline.
Capo detects the chords automatically, but you can edit them in the Practice song view (and also the Tabbing view on macOS). Specifically, you can add missing chords, remove extra ones, change them, and move them around.
19.5.1 Adding Chords
When Capo misses a chord change, or if you wish to insert a chord in the space where chords have been deleted, you can place new chords anywhere in the song. Placing a new chord entry runs a quick chord detection at the playhead to get you started, and plays the chord shape that was detected. Once placed, you can easily change it.
To place a new chord at the playhead location, do one of the following:
- Press K on your keyboard
- Tap the Add Chord toolbar item (you’ll have to add it to the toolbar)
To place a new chord at the playhead location:
- Tap the Add Chord button in the Chords Control Strip
If you do not see the chord appear, you probably need to zoom in because the new chord is too close to the next one.
19.5.2 Changing Chords
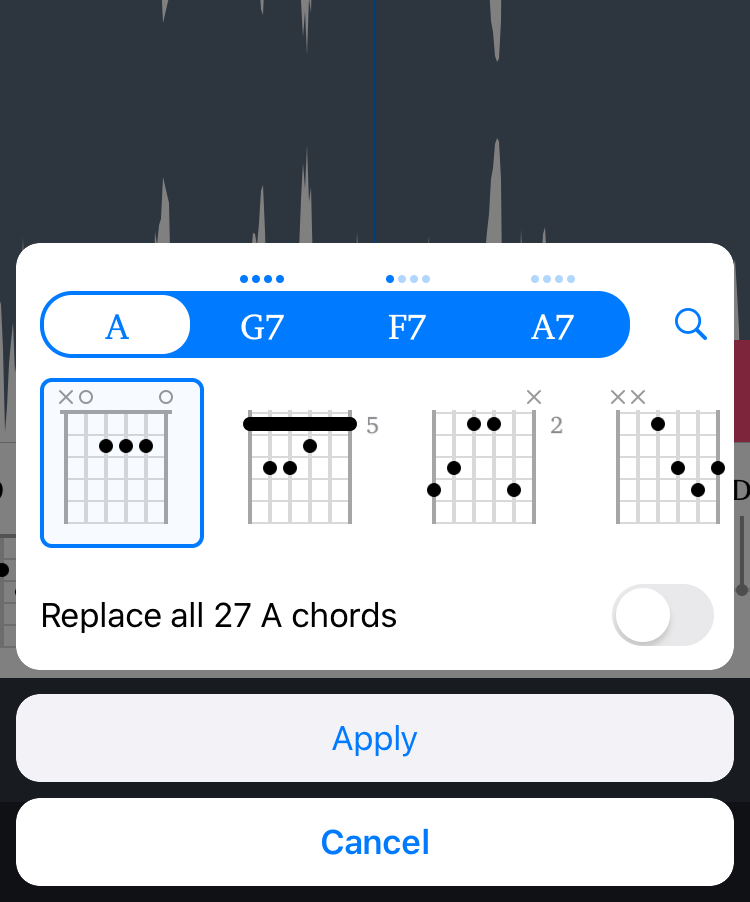
When a chord is selected, you can display the Chord Chooser by tapping its title (on iOS) or double-clicking it (on macOS).
To show the chord chooser:
- Click the chord you’d like to change so that it’s selected
- Double-click on the selected chord
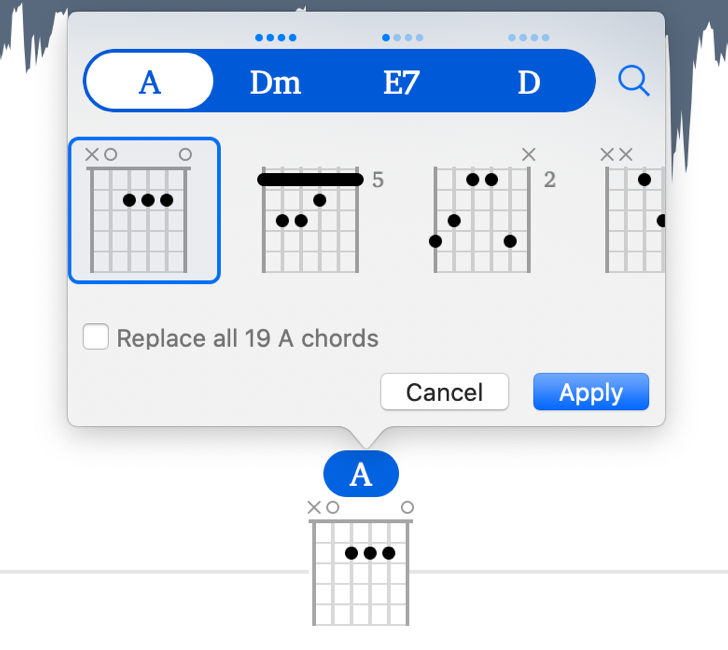
bbmaj7 or em) can be entered. Below you’ll find a scrollable list of diagrams for different voicings of the selected chord, and a checkbox to apply your change to all matching chords across the entire song.
To show the chord chooser:
- Tap the chord you’d like to change so that it’s selected
- Tap on the selected chord
bbmaj7 or em) can be entered. Below you’ll find a scrollable list of diagrams for different voicings of the selected chord, and a checkbox to apply your change to all matching chords across the entire song.